How to Declutter Kitchen: Transform Your Cooking Space in 2025
Most people think their kitchen is just a little messy. The truth is, the average American kitchen holds over 285 items—most of which are never used. That sounds wild, right? What if the real secret to a happier, calmer kitchen is not more storage bins, but simply keeping less?
Table of Contents
- Step 1: Assess Your Current Kitchen Setup
- Step 2: Gather Decluttering Supplies
- Step 3: Sort Items By Category
- Step 4: Decide What To Keep, Donate, Or Discard
- Step 5: Organize Remaining Items Effectively
- Step 6: Maintain Your Decluttered Kitchen Regularly
Quick Summary
| Key Point | Explanation |
|---|---|
| 1. Assess your current kitchen setup | Understand what you have by pulling everything out and evaluating its use and condition. |
| 2. Gather essential decluttering supplies | Collect garbage bags, storage bins, and cleaning products to streamline the decluttering process. |
| 3. Sort items by category | Group kitchen items into clear categories to identify duplicates and organizing needs more effectively. |
| 4. Decide what to keep, donate, or discard | Use critical questions to determine which items truly serve your cooking needs and can be removed responsibly. |
| 5. Maintain your newly organized kitchen | Establish daily and quarterly routines to keep your kitchen clutter-free and adapt to changing needs over time. |
Step 1: Assess Your Current Kitchen Setup
Before diving into your kitchen decluttering journey, you need a clear understanding of your current space. Assessing your kitchen setup is like taking a snapshot of your culinary landscape — revealing what works, what doesn’t, and where potential organizational opportunities exist.
Start by walking through your kitchen with fresh eyes. Pull everything out of cabinets, drawers, and pantry spaces. This might sound overwhelming, but it’s a critical first step in truly understanding what you have. Take note of duplicate items, expired products, and tools you rarely or never use. According to research from Mississippi State University Extension Service, evaluating household spaces can significantly improve overall living conditions.
As you examine each item, ask yourself critical questions: When was the last time I used this? Does this tool serve a genuine purpose in my cooking routine? Can I consolidate similar items? Some kitchen items might seem essential but actually create unnecessary clutter. Professional organizers recommend keeping only items you use at least twice a year.
Create three distinct piles during your assessment: keep, donate, and discard. Be ruthless but practical. Kitchenware that hasn’t seen action in years might be perfect for donation. Broken or unusable items should be responsibly discarded. Check out our guide on kitchen organization for more detailed strategies on making these decisions.
Once you’ve sorted everything, measure your available storage spaces. Understanding your kitchen’s physical constraints will help you plan a more effective organizational strategy. Take precise measurements of cabinet depths, drawer widths, and pantry spaces. This information will be crucial when you start reimagining your kitchen’s layout in subsequent steps of the decluttering process.
Successful assessment means you’ve gained a comprehensive understanding of your kitchen’s current state, identified unnecessary items, and prepared a clean slate for transformative organization.
Step 2: Gather Decluttering Supplies
With your kitchen assessment complete, it’s time to prepare for the actual decluttering process. Having the right supplies will transform your organizing effort from overwhelming to manageable. According to research from Mississippi State University Extension Service, being well-prepared can significantly streamline your decluttering journey.
Start by collecting essential tools that will make your kitchen transformation smoother. You’ll want heavy-duty garbage bags for disposing of expired items, clear storage bins for items you’re keeping, and sturdy boxes for donations. Grab some heavy-duty markers and labels to categorize and identify your sorted items. Pro tip: Clear plastic bins with lids work best for kitchen storage because they protect items from dust and moisture while allowing you to see contents at a glance.
Clean surfaces are crucial during decluttering, so assemble a cleaning kit alongside your organizing supplies. Include multipurpose cleaner, microfiber cloths, a scrub brush, and disposable gloves. As you remove items from cabinets and drawers, you’ll want to wipe down surfaces immediately. This isn’t just about organizing — it’s about creating a fresh, hygienic cooking environment. Check out our decluttering challenge for additional motivation and strategies to keep you on track.
Don’t forget practical clothing and comfort items. Wear comfortable, closed-toe shoes and clothing you don’t mind getting a bit dirty. An apron can protect your clothes, and having a small stool or knee pad can help when you’re sorting through lower cabinets. Keep a water bottle nearby and consider playing some energetic music to keep your spirits high during this process.
Your supplies checklist should include:
- Garbage bags
- Clear storage bins
- Donation boxes
- Markers and labels
- Cleaning supplies
- Comfortable work clothing
By gathering these supplies before starting, you’ll create a smooth, efficient decluttering experience that sets you up for kitchen transformation success.
To help you prepare for your kitchen decluttering project, here is a table summarizing the essential supplies, their purpose, and helpful notes for each item.
| Supply Item | Purpose | Notes |
|---|---|---|
| Garbage bags | Dispose of expired or unwanted items | Use heavy-duty bags for heavier discards |
| Clear storage bins | Store items you are keeping | Opt for clear bins to easily see contents |
| Donation boxes | Collect items for donation | Sturdy boxes recommended for transporting donations |
| Markers and labels | Categorize and identify sorted items | Label clearly to avoid confusion during organizing |
| Cleaning supplies | Clean surfaces during decluttering | Include multipurpose cleaner, cloths, gloves |
| Comfortable clothing | Ensure comfort during the process | Wear closed-toe shoes and an apron if possible |
| Water bottle | Stay hydrated while working | Keep nearby to maintain energy and comfort |
Step 3: Sort Items by Category
Now that you’ve gathered your supplies and assessed your kitchen, it’s time to tackle the most transformative part of decluttering: sorting items by category. Systematic categorization is the secret weapon of successful kitchen organization. According to research from Purdue University Extension, sorting by category helps you understand exactly what you own and eliminate unnecessary duplicates.
Begin by creating distinct sorting zones on a large, clean surface like your kitchen table or countertop. Spread out items from your initial assessment and start grouping them into broad categories. Your primary categories should include cookware, utensils, baking supplies, small appliances, food storage containers, and pantry items. Creating these clear boundaries prevents decision fatigue and makes the sorting process feel more manageable.
As you sort, be ruthless about duplicates and items that no longer serve your cooking style. That third set of measuring cups or the specialty gadget you received as a gift but never use? Now’s the time to let them go. Consider creating a donation pile for items in good condition that someone else might appreciate. Our decluttering guide can help you identify items to remove with confidence.
Pay special attention to expiration dates during this process.
Spices, baking ingredients, and canned goods often lurk in the back of cabinets well past their prime. Check each item carefully and discard anything that’s expired or shows signs of degradation. This step not only clears physical space but also ensures you’re working with fresh, safe ingredients.
Your sorting categories might look like this:
- Cooking Tools (pots, pans, baking sheets)
- Utensils (spatulas, whisks, serving spoons)
- Small Appliances (blender, mixer, toaster)
- Food Storage (containers, zip bags, wraps)
- Pantry Staples (spices, dry goods, canned items)
By meticulously sorting your kitchen items, you’re creating a clear roadmap for reorganization. Each categorized group tells a story about your cooking habits and helps you make informed decisions about what truly belongs in your kitchen space.
Step 4: Decide What to Keep, Donate, or Discard
Deciding what stays and what goes is the most crucial moment in your kitchen decluttering journey. This step requires emotional intelligence and practical decision-making skills. According to psychological research published in Frontiers in Psychology, keeping only items that serve a purpose or spark joy can significantly reduce stress and improve overall well-being.
Apply a strategic approach to your sorting process. For each item, ask yourself three critical questions: When was the last time I used this? Does this item serve a genuine purpose in my cooking routine? Would I buy this again today? Items that haven’t been used in a year are prime candidates for removal. Be particularly ruthless with specialty gadgets that seemed like a good idea but have since collected dust.
Create three distinct zones for your sorted items: keep, donate, and discard. The ‘keep’ zone should include items you use regularly, items in excellent condition, and tools that genuinely support your cooking style. For donation, consider kitchen items that are still in good condition but no longer fit your lifestyle. Check out our guide on kitchen decluttering for additional guidance on what makes a good donation item.
For items heading to the discard pile, be mindful of proper disposal. Broken electronic appliances, non-recyclable plastics, and items beyond repair should be responsibly discarded. Cookware with significant wear, chipped ceramics, and warped baking sheets fall into this category. Some items might be recyclable, so take a moment to separate materials appropriately.
Consider these criteria for your decision-making:
- Frequency of use in the last 12 months
- Current condition of the item
- Emotional attachment vs. practical utility
- Potential for donation or recycling
- Replacement cost if needed in the future

By the end of this process, you’ll have a curated collection of kitchen items that truly serve your cooking needs. Remember, decluttering isn’t about creating a sterile space — it’s about designing a functional, inspiring kitchen that makes cooking a joy.
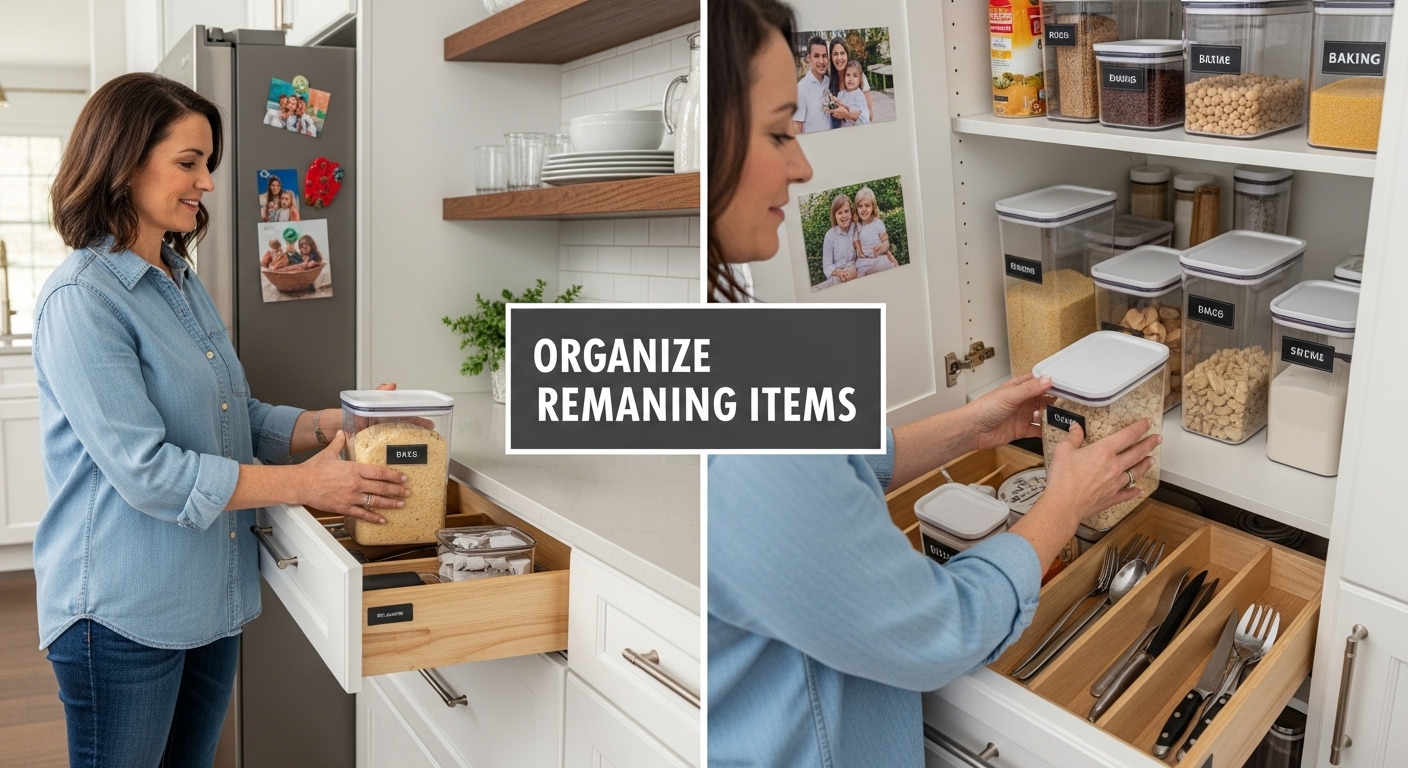
Step 5: Organize Remaining Items Effectively
With your kitchen items sorted, it’s time to transform your space into a functional and intuitive cooking zone. Effective organization is about creating a system that works for your unique cooking style and daily routine. Think of your kitchen as a well-choreographed dance floor where every item has a strategic position and purpose.
Start by considering frequency of use as your primary organizational principle. Items you use daily should be easily accessible, while occasional tools can be stored in slightly less convenient spaces. Place your most-used cookware and utensils in lower cabinets or on countertop organizers. Invest in drawer dividers and clear storage containers to create visual clarity and prevent future clutter. Learn more about reducing household clutter to maintain this organizational momentum.
Group similar items together to create logical zones in your kitchen. Baking supplies should live together, with measuring cups, mixing bowls, and baking sheets stored in proximity. Create a coffee and tea station with mugs, filters, and related accessories clustered in one area. Implement a similar approach for cooking oils, spices, and pantry staples. Vertical storage solutions like tiered shelves and hanging racks can dramatically increase your usable space.
Consider implementing the ‘prime real estate’ concept in your kitchen organization. The most accessible shelves and drawers should host your most frequently used items. Lower shelves are perfect for heavy pots and pans, while upper shelves can store lighter, less-used items. Use clear, labeled containers for dry goods to prevent mysterious ingredients from languishing forgotten in dark corners.
Your organization strategy should include:
- Vertical storage maximization
- Frequency-based item placement
- Clear, labeled containers
- Logical item grouping
- Easy accessibility for daily tools
By thoughtfully organizing your remaining kitchen items, you’ll create a space that not only looks clean but also supports your cooking creativity and efficiency.
Step 6: Maintain Your Decluttered Kitchen Regularly
Decluttering isn’t a one-time event — it’s an ongoing process that requires consistent attention and mindful practices. Maintaining your newly organized kitchen is just as important as the initial transformation. According to research from Harvard Health, a well-organized kitchen can support healthier eating habits and more efficient cooking routines.
Establish a daily 10-minute reset routine that prevents clutter from creeping back into your space. At the end of each day, return items to their designated spots, wipe down counters, and do a quick scan for any misplaced tools or ingredients. Think of this as a small investment that prevents massive organizational backsliding. Learn more about keeping your kitchen counters clear to maintain your hard-earned organizational momentum.
Implement a quarterly review system to reassess your kitchen’s organization. Every three months, pull out your storage containers, check expiration dates, and evaluate whether your current system still serves your cooking needs. Kitchens evolve with your lifestyle — cooking habits change, new tools emerge, and your organizational needs shift. Be flexible and willing to adjust your storage solutions as needed.
Create sustainable habits that support long-term organization. Store items immediately after use, clean as you cook, and resist the temptation to accumulate unnecessary kitchen gadgets. Develop a one-in-one-out rule for kitchen tools: if you bring a new item into the kitchen, something else must go. This prevents gradual re-cluttering and encourages mindful purchasing.
Your maintenance checklist should include:
- Daily 10-minute reset
- Weekly deep clean
- Monthly inventory check
- Quarterly organizational review
- Continuous mindful purchasing
By treating kitchen organization as an ongoing practice, you’ll create a functional, stress-free cooking environment that adapts to your changing lifestyle.
Here is a kitchen decluttering maintenance checklist table to help you establish routines and stay organized over time.
| Maintenance Task | Frequency | Purpose |
|---|---|---|
| 10-minute daily reset | Daily | Prevents clutter and maintains organization |
| Deep clean | Weekly | Keeps surfaces sanitary |
| Inventory check | Monthly | Monitors food and supply levels |
| Organizational review | Quarterly | Assesses system effectiveness and adapts |
| Mindful purchasing | Ongoing | Stops unneeded accumulation |
| One-in-one-out rule | Ongoing | Encourages regular decluttering |
Reclaim Peace in Your Kitchen With Simple Neat Home
Are you feeling overwhelmed by cluttered countertops, overflowing drawers, or a kitchen that just does not support your cooking goals? If the steps in ‘How to Declutter Kitchen: Transform Your Cooking Space in 2025’ inspired you to make a change but you feel unsure how to stick with it, you are not alone. Many readers face struggles like decision fatigue, trouble letting go of unused tools, and the challenge of keeping an organized space over time. That is where Simple Neat Home steps in to support your journey.
Experience more calm, functionality, and pride in your home by using our practical resources. Explore our kitchen organization guide for expert strategies that help you stay focused and motivated. Ready for an accountability boost? Take our decluttering challenge and transform your kitchen for good. Now is the best time to create a kitchen you truly love.
Frequently Asked Questions
How do I start decluttering my kitchen?
Begin by assessing your current kitchen setup. Pull everything out of your cabinets and drawers, take note of what you have, and create piles for keeping, donating, and discarding.
What supplies do I need for decluttering my kitchen?
Collect essential supplies such as heavy-duty garbage bags, clear storage bins, donation boxes, markers, labels, and cleaning supplies. Comfortable clothing and shoes are also recommended.
How can I effectively organize my kitchen items?
Sort items by category and frequency of use. Frequently used items should be easily accessible while less-used tools can be stored in harder-to-reach places. Use clear bins and labels for easy identification.
How often should I maintain my decluttered kitchen?
Implement a daily reset routine to keep clutter at bay and perform a more thorough organizational review every three months. Regular cleaning and mindful purchasing help maintain your kitchen’s organization.
Recommended
- 15 Things You Can Declutter From Your Kitchen RIGHT NOW
- Understanding the Kitchen Organization Guide for Better Cooking | Simple Neat Home
- 5 Easy Steps to Decluttering Your Kitchen Countertops
- 10 Simple Steps to Declutter Your Kitchen | Simple Neat Home
- Understanding Copper vs Ceramic Cookware: Key Insights – Brass & Steel